
A well-designed bathroom is very important in any house. Along with serving practical needs, it also enhances the room’s overall aesthetic appeal and comfort.
To achieve a stylish and useful outcome, various factors must be carefully considered when remodeling a bathroom.
The ceiling is one feature that can significantly improve a bathroom’s aesthetic appeal.
Styrofoam ceiling tiles are a common choice for bathroom ceilings. These tiles are a good option for bathroom remodeling projects because they are lightweight, adaptable, and provide several advantages.
In this post, we will specifically look at the advantages and uses of Styrofoam ceiling tiles for bathroom remodeling.
We will highlight why Styrofoam ceiling tiles are a fantastic choice to take into account when renovating a bathroom by looking at their unique qualities, durability, aesthetic appeal, and ease of installation.
what are Styrofoam Ceiling Tiles?
Expanded polystyrene foam is used to make decorative tiles called polystyrene or Styrofoam ceiling tiles.
They are made specifically to be installed on ceilings, offering an aesthetically pleasing and useful answer for remodeling projects.
There are numerous designs and patterns of foam ceiling tiles available, providing a wide range of aesthetic choices.
Benefits of Using Styrofoam Ceiling Tiles in Bathrooms
- Bathrooms are prone to high moisture levels, which can promote the growth of mold and mildew. Because they are made to withstand moisture, Styrofoam ceiling tiles are an excellent option for bathrooms. Their closed-cell design aids in preventing water absorption, lowering the possibility of mold and mildew growth, and extending the life of the ceiling tiles.
- Simple cleaning and upkeep: The ceiling tiles made of polystyrene are comparatively simple to clean and maintain. They can be dusted frequently to keep them looking clean and can be cleaned with a damp cloth or sponge. Polystyrene tiles are a practical option for busy bathrooms because they don’t need special cleaning agents or intensive maintenance, unlike materials like wood or fabric.
- Acoustic qualities for soundproofing: Because Styrofoam ceiling tiles are made of foam, they have natural acoustic qualities that can aid in soundproofing the bathroom. They can dampen and absorb sound waves, which lessen echoes and noise transmission inside the room. This may contribute to a quieter, more tranquil bathroom atmosphere that promotes privacy and relaxation.
- Enhanced aesthetics and design possibilities: Polystyrene ceiling tiles come in various textures and patterns, allowing for customization and creative expression. Polystyrene ceiling tiles can assist in producing the desired aesthetic result in your bathroom, whether you prefer a smooth surface, a textured design, or even a three-dimensional pattern.
- Options for painting: Another benefit of Styrofoam ceiling tiles is that they are easily painted. Using water-based paints, you can easily match the tiles to the color scheme of your bathroom or make a distinctive visual statement. This versatility in paint ability creates countless opportunities for customization and coordination with other bathroom design elements.
- Polystyrene ceiling tiles can significantly improve a bathroom’s overall ambiance and aesthetic appeal, giving it a more elegant and opulent feel. They can contribute to the creation of a classy and opulent atmosphere thanks to their intricate designs, textures, and paint options. Polystyrene ceiling tiles can help you give your bathroom a stylish and aesthetically pleasing look, whether you prefer a traditional, modern, or vintage appearance.
These advantages make it clear that Styrofoam ceiling tiles for bathroom remodeling offer more than just aesthetic advantages.
They add value to any bathroom renovation project because of their resistance to moisture, ease of cleaning, soundproofing, and ability to improve the overall design aesthetics.
Installation Process of Styrofoam Ceiling Tiles in Bathrooms
step 1: Tools and materials needed:
- Styrofoam ceiling tiles
- Adhesive (specifically designed for Styrofoam)
- Tape measure
- Utilizing a utility knife or scissors to cut tiles
- Caulk gun (if applying additional sealing with caulk)
- if you intend to paint the tiles, paint, and paintbrushes
- Step stool or a ladder
- gloves and goggles for protection
- Protective drop cloths or plastic sheets
- cleaning supplies (a sponge and a damp cloth)
step 2: Preparing the ceiling surface:
- Ensure the ceiling surface is dust-free, dry, and free of any other debris or loose paint. Use a damp cloth surface and get rid of any dirt or grime, use a damp cloth or sponge.
- If the ceiling has any cracks or inconsistencies, fill them with an appropriate filler and let it fully dry. To create a smooth and even surface, sand down any rough spots.
step 3: Measuring and cutting the tiles:
- To determine the necessary number of tiles, measure the size of the ceiling. It’s crucial to take into account any ceiling vents or fixtures and adjust the measurements accordingly.
- The required dimensions should be marked on the tiles using a measuring tape after they have been laid out on a clean surface. To ensure accuracy, double-check the measurements before cutting.
- The tiles should be carefully cut along the drawn lines using a utility knife or scissors. When cutting the tiles, proceed with caution and put on safety goggles and gloves.
step 4: Applying adhesive and installing the tiles:
- Following the manufacturer’s instructions, apply the adhesive to the back of each tile. The adhesive should be applied evenly to the tile’s back surface using a caulk gun or other suitable applicator.
- Press the tile’s adhesive-coated side firmly onto the ready ceiling surface, beginning in one of the corners. For proper adhesion, keep it in place for a short while.
- Apply adhesive to each tile individually and install them in a staggered pattern, slightly overlapping the edges to create a seamless appearance. Caulk or adhesive that has escaped from the edges should be cut back.
- Keep going until all the tiles are in place, making sure they fit together tightly and accurately.
step 5: Finishing touches and cleanup:
- Once all of the tiles are in place, follow the manufacturer’s instructions and let the adhesive completely dry. Normally, this takes a few hours or even overnight.
- If desired, use a paintbrush and water-based paint to decorate the newly installed tiles. Before using the bathroom, let the paint completely dry.
- Use a damp cloth or sponge to remove any extra adhesive, paint, or debris from the installation process. Clear the area of any plastic or drop cloth used as protection.
- Examine the installed tiles for flaws or frayed edges. Apply a small amount of adhesive or caulk, as necessary, to seal any gaps or fix any loose tiles
Polystyrene ceiling tile installation in a bathroom can be successfully finished by adhering to these steps. For the best results, it is crucial to carefully read and adhere to the directions provided by the adhesive and tile manufacturers.
Styrofoam Ceiling Tile Maintenance Tips
Regular cleaning practices:
- To prevent the accumulation of dust and dirt, regularly dust the ceiling tiles with a soft cloth or feather duster.
- Use a damp sponge or cloth dampened with water and mild soap to gently wipe the tiles for deeper cleaning. Avoid using harsh scrub brushes or abrasive cleaners that could scratch the surface.
- Pay close attention to areas that are close to vents or light fixtures because they tend to collect more dust and may need to be cleaned more frequently.
Preventing water damage and mold growth:
- Make sure the bathroom is properly ventilated to avoid an excessive buildup of moisture. To let moisture escape during and after showers, use exhaust fans or open windows.
- Address any leaks or water damage in the bathroom right away because mold growth and Styrofoam tile damage can result from moisture exposure.
- Apply moisture-resistant paint or sealant to the tiles if necessary to add barrier of defense against moisture.
Handling repairs and replacements:
- Check the ceiling tiles frequently for any indications of damage, including cracks, frayed edges, and discoloration. In order to stop further harm, deal with these problems right away.
- Use a suitable adhesive to secure any loose tiles and fill in tiny cracks as needed for minor repairs. Before using the loo, apply the adhesive in accordance with the manufacturer’s instructions and let it completely dry.
- If a tile is seriously broken and can’t be repaired, gently pry it away from the ceiling. Replace it with a fresh, identically sized, Styrofoam ceiling tile. Ascertain proper alignment and adhesion to the adjacent tiles.
Always keep in mind to adhere to the precise maintenance instructions given by the Styrofoam ceiling tile manufacturer. You can ensure the durability and aesthetic appeal of your bathroom ceiling by putting regular cleaning procedures in place, avoiding water damage, and taking care of repairs or replacements as soon as they become necessary.
Styrofoam Ceiling Tile Design Ideas for Bathrooms
Contemporary and sleek designs:

- Choose smooth, flat Polystyrene ceiling tiles in a neutral shade, like white or grey, to give your bathroom a fresh, contemporary appearance.
- For a sleek and sophisticated look, think about using square or rectangular tiles with simple patterns and clean lines.
- For a coordinated and fashionable bathroom design, combine modern fixtures, simple bathroom furniture, and sleek lighting with contemporary ceiling tiles.
Vintage and classic styles:
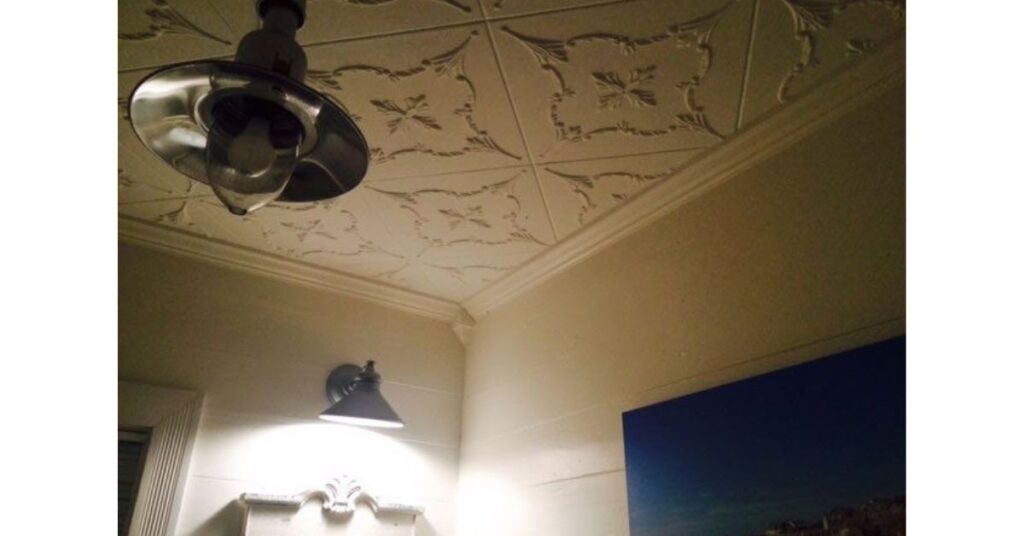
- Choose Polystyrene ceiling tiles that resemble decorative plaster or old-fashioned tin for your bathroom to add a touch of class and nostalgia.
- If you want to create a vintage-inspired atmosphere, choose tiles with elaborate patterns, minute details, or embossed designs.
- To complete the timeless look, combine the retro-style ceiling tiles with vintage bathroom fittings like clawfoot tubs, pedestal sinks, and traditional faucets.
Adding dimension with textured tiles:
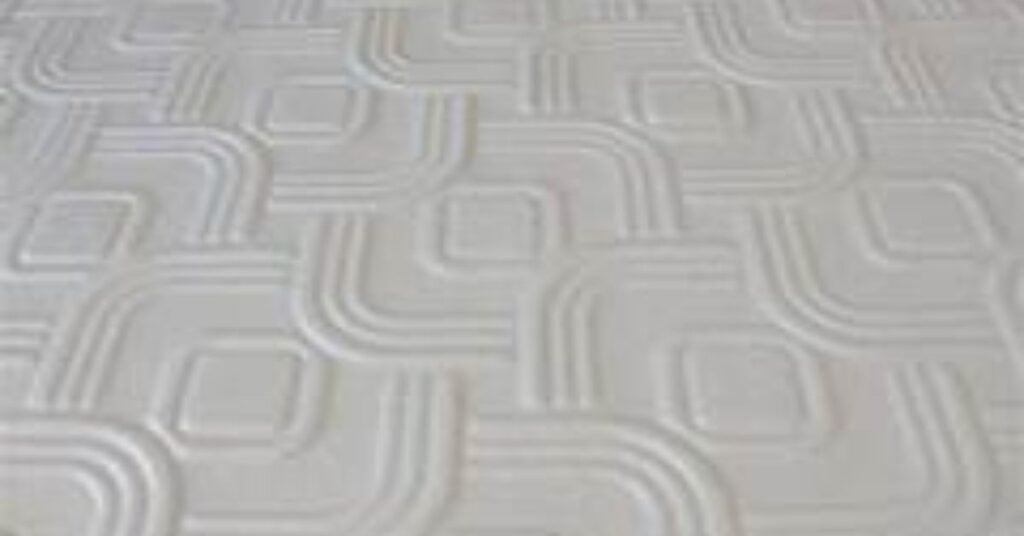
- To give your bathroom ceiling depth and visual interest, think about using textured polystyrene ceiling tiles.
- In order to add a distinctive and tactile element to the space, choose tiles with raised patterns, 3D designs, or textured surfaces.
- Create a visually interesting and captivating ceiling design by experimenting with various textures and mixing and matching tiles.
Creating a focal point with decorative tiles
- Install decorative Styrofoam ceiling tiles in a focal point area, like above the bathtub or vanity, to draw attention and add a touch of opulence.
- Choose tiles with elaborate patterns, motifs, or artistic designs to make a statement and improve the bathroom’s overall appearance.
- Add the right lighting to go with the decorative ceiling tiles to draw attention to and emphasize the focal point.
When choosing the design of polystyrene ceiling tiles, keep in mind to take the overall style and theme of your bathroom into account. Including these design concepts can help you create a visually stunning and unique bathroom space, regardless of your preferred modern, vintage, textured, or decorative style.
Conclusion
This post has looked at the advantages and uses of Styrofoam ceiling tiles in bathroom remodeling.
We’ve emphasized their light weight, insulation capabilities, design flexibility, affordability, moisture resistance, ease of cleaning and maintenance, acoustic qualities, and capacity to improve the aesthetics of the bathroom area.
Polystyrene ceiling tiles are strongly advised for your bathroom remodeling project in light of all the benefits mentioned.
With the support of these tiles, you can give your bathroom a makeover that is both useful and popular, making it an increasingly appealing, comfortable space.
The adaptability, simplicity of installation, and affordability of polystyrene ceiling tiles make them a fantastic choice for anyone building a home or a professional contractor.
FAQs: Styrofoam Ceiling Tiles
Are Styrofoam ceiling tiles fire-resistant?
Styrofoam ceiling tiles are not fire-resistant. They are made from EPS foam, which can melt or burn when exposed to high temperatures or open flames. It is important to follow fire safety regulations and install additional fire protection measures, such as fire-rated coatings or sprinkler systems, as required.
Can Styrofoam ceiling tiles be removed without damaging the ceiling?
Styrofoam ceiling tiles can typically be removed without causing significant damage to the ceiling surface if installed properly. Gently pry them off using a putty knife or similar tool, taking care not to apply excessive force. Patch any small holes or imperfections with filler and repaint the ceiling if necessary.
Are Styrofoam ceiling tiles eco-friendly?
Styrofoam ceiling tiles are not considered eco-friendly due to the environmental impact associated with the production and disposal of EPS foam. However, some manufacturers offer eco-friendly alternatives made from recycled or sustainable materials. Consider exploring these options if environmental sustainability is a priority.
Why choose Styrofoam ceiling tiles?
Styrofoam ceiling tiles offer several advantages. They are affordable, easy to install, and lightweight, making them suitable for DIY projects. They also provide insulation and soundproofing properties and can cover up minor imperfections on the ceiling surface.
Also Read:
5 Inspiring Wood Ceiling Beam Ideas to Transform Your Space
The Ultimate Guide to Fabric Ceilings: Inspiring Ideas for a Show-stopping Space