
Do you want to add stunning looks to your home’s interior? then Enter a world of wonderment with us. The LED cloud ceiling adds a contemporary aesthetic touch to an otherwise basic lighting fixture, resulting in a visually stunning and tranquil atmosphere. You can create a starry atmosphere in your living or workspace by following the steps we’ll walk you through in this guide. Together, let’s set out on this fascinating adventure!
What is an LED Cloud Ceiling?

An LED cloud ceiling is simply a lighting fixture that creatively simulates the look of a cloudy sky, presenting an original and engrossing lighting experience for any interior area.
Visualize this: Imagine looking up at the sky, where fluffy clouds drift carelessly, mellowing the sunlight and bringing a calming atmosphere. Now, bring that heavenly atmosphere into your living room or office. That is what an LED cloud ceiling is all about.
Advantages of an LED Cloud Ceiling
Energy Efficiency: According to research the energy efficiency of LED technology is well known. When compared to conventional lighting sources, LED cloud ceilings use a great deal less energy, which lowers electricity costs and leaves a smaller environmental impact. Ambient lighting can be aesthetically pleasing for homeowners without sacrificing energy efficiency.
Customizable Lighting Options: The flexibility of LED cloud ceilings’ lighting options is one of their best qualities. The brightness, color temperature, and even the color of the light emitted can all be adjusted by the user.
Due to its adaptability, homeowners can change the lighting to suit various situations, such as brightening and energizing light for activities during the day or softening it for relaxing in the evening.
Mood Enhancement: Different moods can be effectively created in a living space with the help of LED cloud ceilings. It is possible to create a variety of atmospheres by varying the color and intensity of light.
While colder tones can improve concentration and productivity, warmer, softer tones, for instance, can create a more homey, intimate atmosphere. Because of their versatility, LED cloud ceilings are the best option for rooms with a range of uses.
Natural Light Simulating: LEDs can replicate the warmth and coziness of natural sunlight quite well. This feature is especially helpful in places like basements or rooms with small windows that don’t get a lot of natural light.
LED cloud ceilings enhance the quality of natural light in a living area, making it healthier and more comfortable.
Low Maintenance: Compared to conventional lighting solutions, LED lighting fixtures often have a longer lifespan and require less maintenance. For homeowners, this means fewer replacements and fewer headaches. A more sustainable lighting solution and long-term cost savings are made possible by the low maintenance requirement.
Space Illusion and Design Impact: LED cloud ceilings have the potential to give the impression of depth and space. These ceilings can visually open up a space and give it a more dynamic, spacious feeling when placed correctly and with well-designed designs.
An intelligently designed LED cloud ceiling can dramatically improve a home’s overall aesthetic appeal.
how to Plan Your LED Cloud Ceiling?
Room Selection:
Suitable Rooms: LED cloud ceilings can be a fascinating addition that improves both the look and feel of a home’s various rooms. Take into account putting them in:
Bedrooms: Establish a tranquil, sleep-promoting environment. Adaptable lighting changes color tones based on the time of day, from soothing warm tones to energizing cool tones.
Living Rooms: An LED cloud ceiling adds a striking visual element to your living area. Setting the mood for quiet evenings, movie nights, or social gatherings is made possible by the variety of lighting options available.
Home theaters: Installing LED cloud ceilings will improve the movie-going experience. Make movie nights genuinely unforgettable by creating dynamic lighting effects that enhance the action on screen and create immersive environments.
Considerations:
Size and Layout: A room’s size and arrangement are important factors to take into account when evaluating the effects of an LED cloud ceiling. Bigger spaces might benefit from more ornate designs, while smaller ones might need a more understated style to prevent overpowering the space.
Ceiling Height: When designing an LED cloud ceiling, take the height of the ceiling into account. Deeply complex designs can be investigated in spaces with higher ceilings. A simpler design might be better for spaces with lower ceilings.
Design Inspiration:
Cloud Patterns: take into consideration natural-looking cloud patterns.
Realistic Clouds: Use supple, flowing shapes to replicate the appearance of actual clouds. To create a calm and natural atmosphere, experiment with different sizes and densities.
Abstract Cloud Art: Investigate creative and abstract interpretations of clouds in abstract art. Stylized cloud formations or geometric patterns can provide a contemporary and distinctive touch.
Lighting Effects:
Dynamic Color Transitions: LED Cloud Ceilings with Dynamic Color Transitions: Set them up to alternate between different hues with ease. This feature is ideal for coordinating with particular activities or evoking various moods.
Twilight Glow: Emulate the serene tones of a twilight sky with Twilight Glow. This type of design creates a peaceful, comfortable atmosphere that is perfect for bedrooms.
3.1 Room Selection
Materials and Tools Needed

- Materials:
- LED Cloud Ceiling Kit:
- LED Strips: Select premium LED strips that can generate a broad spectrum of colors. Based on the size of your ceiling, determine the required length.
- Diffusers: Invest in diffusers to even out and soften the light. In cloud ceiling kits, diffuser panels made especially for this use are frequently included.
- Controller and Remote: Choose a controller with programmable brightness and color settings. Simple adjustments are facilitated by a remote control.
- Power Supply: Make sure the power supply is dependable and meets the needs of your LED strips. A transformer or power adapter might be part of this.
- Mounting Hardware: Installing the LED strips and diffusers on the ceiling requires secure mounting hardware, such as brackets, screws, and anchors, depending on the design that was selected.
- Additional Materials:
- Ladder: To safely access and work on the ceiling, a sturdy ladder is essential. Select a height that allows for the room’s ceiling height.
- Ceiling Tiles (Optional): Think of ceiling tiles as the LED cloud ceiling’s foundation. These tiles can improve light diffusion and make installation easier.
- Starry Night Accessories (Optional): If you want to create a starry night effect, buy tiny LED lights that look like stars and use adhesive to place them in strategic places on the ceiling.
- Tools:
- Drill: To drill holes for mounting hardware, you’ll need a power drill equipped with the right drill bits for the type of ceiling you have.
- Screws and Anchors: Choose anchors and screws that work with the material of your ceiling. These are going to be used to firmly fasten the other hardware and mounting brackets.
- Screwdriver: A powered or manual screwdriver for firmly tightening screws.
- Measuring Tape: Precise measurements are essential to guaranteeing appropriate LED strip alignment and spacing.
- Pencil: Mark mounting locations and other guidelines on the ceiling with a pencil.
- Level: By using a level, one can ensure that the LED strips are positioned straight and evenly, eliminating any visual irregularities.
- Wire Strippers (if needed): To prepare the ends of the wires for customization or connecting additional wiring, wire strippers might be needed.
- Safety Gear: Wear the proper protective gear when handling tools and working on the ceiling, such as gloves and safety glasses.
Step-by-Step Installation Process
- Ceiling Preparation:
- Importance of Ceiling Preparation: To guarantee a smooth and even application, the ceiling surface must be prepared before beginning the installation of an LED cloud ceiling. This step is essential for optimizing light diffusion and producing a finish that looks professional.
- Inspect the Ceiling: Look for any flaws, cracks, or irregularities in the ceiling. After using the proper filler to close any gaps or holes, sand the surface to produce a smooth finish.
- Clean the Surface: Clear the ceiling of any debris, dust, or dirt. A spotless surface helps to create a polished final look and guarantees improved adherence to the LED strips.
- Optional: Ceiling Tiles: Make sure the ceiling tiles are firmly in place if you plan to use them as the foundation for the LED cloud ceiling. Tiles can improve light diffusion and make installation simpler.
- LED Strip Installation:
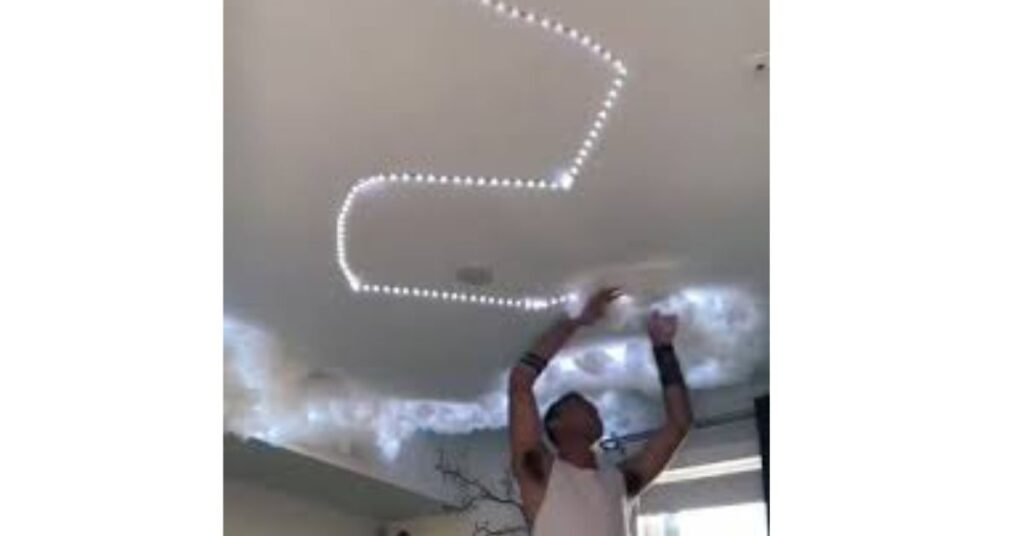
- Plan the Design: Choose the cloud pattern you want to see on the ceiling. Mark important details or the cloud outline with a pencil.
- Install Mounting Brackets: Apply the mounting brackets to the ceiling with the proper screws and a drill. The purpose of these brackets is to act as anchor points for the LED strips.
- Attach LED Strips: Adhere the LED strips to the mounting brackets with caution, making sure to follow the designated cloud pattern. The majority of strips include an adhesive backing for simple installation.
- Conceal Wiring: Use cable clips or brackets to secure the wiring to conceal it as it runs along the ceiling. A cleaner, more polished look is achieved by hiding the wiring.
- Connect Strips and Controller: To connect the LED strips to the controller, adhere to the manufacturer’s instructions. To make sure the strips react to the controller settings correctly, test the connections.
- Secure Loose Ends: To guarantee that the LED strips stay firmly in place, tack down any loose ends with extra adhesive or clips.
- Diffuser Placement:
- Select the Right Diffusers: Select diffusers based on how your LED strips fit in terms of size and shape. Diffusers are essential for dispersing and mellowing the light that LEDs emit.
- Attach Diffusers: After installing the LED strips, cover them with the diffusers and fasten them to the ceiling. A lot of diffusers have snap-on designs, but some might need light pressure to fit firmly.
- Secure Diffusers in Cloud Pattern: Make sure the diffusers follow the shape of the LED strips by aligning them with the cloud pattern. If provided, fasten them firmly in place with brackets or clips.
- Check for Even Light Distribution: Take a step back and evaluate the setup to make sure the diffusers produce a consistent glow. If necessary, move the diffusers around to create the illusion of evenly lit clouds.
how to do Wiring and Power?
- Connecting LED Strips to a Power Source:
- Identify Components: Become familiar with the LED kit’s parts, such as the controller, power supply, and LED strips. Make sure the power supply is compatible with the voltage that the LED strips require.
- Cutting and Extending: If required, cut the LED strips according to instructions. You can precisely fit the strips to the dimensions of your ceiling with certain kits that offer customization options. If extending, ensure it’s done safely and correctly by following the manufacturer’s instructions.
- Connectors and Wires: Connect the LED strips to the controller using the supplied connectors. Connect the wires securely, paying attention to the color-coded instructions. To prevent loose connections, make sure the connectors are securely fitted.
- Controller Configuration: Configure the controller based on your personal preferences. This could entail modifying the dynamic lighting effects, color, and brightness. For detailed instructions, see the user manual that comes with the controller.
- Connect to Power Supply: Place the power supply into an appropriate wall socket. Make sure the connection is secure by connecting the other end to the controller. Keep circuits from being overloaded, and use surge protectors when necessary.
- Safety Tips:
- Check Voltage Compatibility: Make sure the power supply’s output voltage and the LED strips’ voltage are equal. LEDs can sustain damage from mismatched voltages.
- Secure Wiring: Use clips or brackets to keep wiring tidy and safe. Wiring should not be installed in busy places to avoid unintentional damage.
- Follow Manufacturer Instructions: Pay close attention to the installation and wiring instructions provided by the manufacturer. Following these directions incorrectly could void warranties or jeopardize safety.
- Power Alternatives:
- Battery-powered Options: Certain LED kits come with battery-powered options that allow for installation flexibility and eliminate the need for direct wiring to an electrical outlet.
Testing and Troubleshooting:
- Thoroughly Testing the Lighting System:
- Initial Functionality Check: Before completing the installation, conduct an initial functionality check. Ensure that the LED strips respond to the controller, adjusting color, brightness, and any dynamic lighting effects.
- Color and Transition Testing: Test various color options and transitions to confirm that the LED strips smoothly transition between settings. Verify that the colors accurately match the selected settings on the controller.
- Brightness Adjustment: Assess the brightness levels and confirm that the LED strips can be adjusted to meet your preferences. Check for any flickering or uneven brightness across the strips.
- Controller Range: Test the operational range of the controller. Ensure it effectively communicates with the LED strips from various positions within the room.
- Remote Control Functionality: If a remote control is included, test its functionality. Confirm that all buttons work as intended and that there is a reliable connection between the remote and the controller.
- Starry Night Effects (if applicable): If incorporating starry night effects, verify that the additional LED lights representing stars are functioning correctly. Adjust their intensity if necessary.
- Common Troubleshooting Tips:
- Check Power Connections: Verify the security of every power connection. Partial functionality or flickering may be caused by loose connections. Verify that the right voltage is being supplied by the power supply.
- Inspect Wiring: Check the wiring for any loose connections, fraying, or damage. To prevent electrical problems, replace damaged sections and secure loose wires.
- Review Controller Settings: Make sure the controller settings correspond to your preferences by checking them twice. Unexpected lighting behavior could result from incorrect configurations.
- Address Remote Interference: When using a remote control, keep in mind that other electronic devices may cause interference. If necessary, reposition the device or think about reprogramming the remote.
Conclusion:
In your journey to create an LED cloud ceiling, don’t hesitate to get creative and infuse your personal touch.
Experiment with different cloud patterns, lighting effects, and colors to tailor the design to your preferences and the ambiance you wish to achieve. The versatility of LED technology allows for endless possibilities, turning your ceiling into a unique and captivating feature of your living space.
Embrace the opportunity to personalize your LED cloud ceiling, transforming it into a visual masterpiece that complements your home and adds a touch of modern elegance.
FAQs
Can I use any type of LED light to create a cloud ceiling?
It’s recommended to use LED strip lights or LED bulbs with diffusers for a uniform glow and energy efficiency.
Will an LED cloud ceiling significantly increase my electricity bill?
LED lights are energy-efficient, so while there will be some increase in electricity usage, it will likely be minimal compared to traditional lighting options.
How difficult is it to install an LED cloud ceiling?
The difficulty level depends on your familiarity with electrical work and DIY projects. It’s important to follow safety guidelines and take your time with the installation process.
Can I customize the color and brightness of the LED cloud ceiling?
Indeed, a lot of LED lights have controllable color and brightness settings that let you set the ideal mood for your room.
How long does it take to complete an LED cloud ceiling project?
The time required depends on the size of the ceiling and your level of expertise. On average, it may take a few days to complete the installation process.
Also Read:
5 Inspiring Wood Ceiling Beam Ideas To Transform Your Space
7 Captivating Vaulted Ceiling Crown Molding Ideas