
A drop ceiling, also known as a suspended ceiling or false ceiling, is a secondary ceiling installed beneath the main structural ceiling.
This versatile solution is composed of lightweight ceiling tiles or panels supported by a grid framework made of metal channels or wooden beams.
Common materials used for these panels include metal, gypsum, or mineral fiber.
In this comprehensive guide on how to install drop ceiling in basement, we’ll walk you through the essential steps and considerations for transforming your space with ease.
The primary purposes of drop ceilings are:
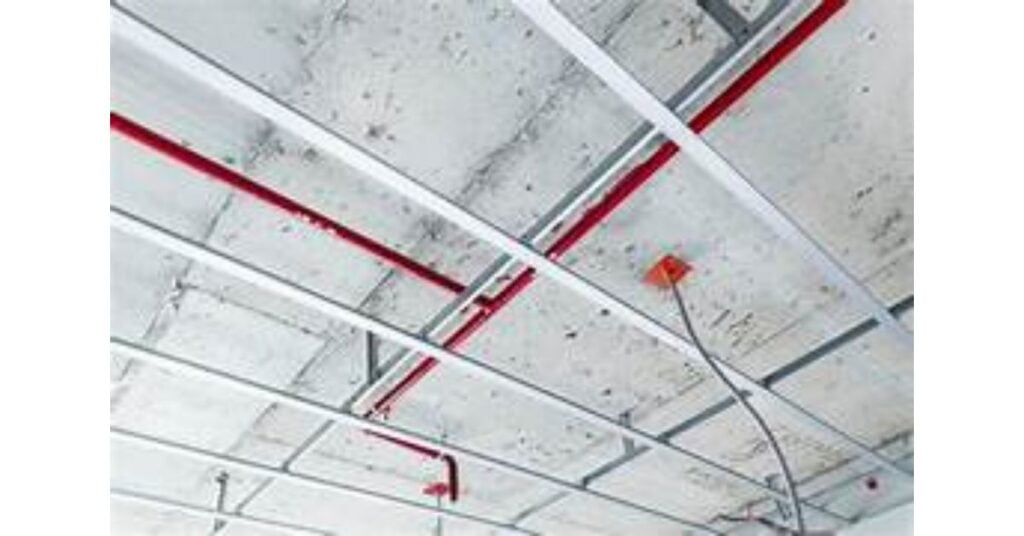
- Concealing Utilities: HVAC ducts, plumbing, and electrical wiring that extend above the structural ceiling are all covered by drop ceilings. It looks cleaner and more attractive because of this concealment.
- Acoustic Insulation: By creating an air gap between the drop ceiling and the structural ceiling, sound insulation is enhanced. This is especially beneficial in noisy environments like offices, schools, or commercial spaces.
- Thermal Insulation: In addition to regulating indoor temperatures and lowering energy consumption, the air gap also offers some thermal insulation.
- Simple Access: Drop ceilings make it simple to access utilities for upkeep or repairs. It is possible to access pipes, wires, or other systems without causing harm to the main ceiling by taking out a ceiling tile.
Essential Preparations for How to Install Drop Ceiling in Basement
A. Determine the Basement’s size
Take precise measurements of your basement’s dimensions before starting the drop ceiling installation. This step makes sure you buy the right amount of materials and efficiently plan the layout. Take measurements of the basement’s length, width, and height. Make a note of any anomalies or obstructions, like ductwork or support beams.
B. Gather Necessary Tools and Materials
To assemble your drop ceiling, collect the following equipment and supplies:
- Drop Ceiling Kit: Get a complete drop ceiling kit, which comes with ceiling tiles, suspension wires, and a grid framework.
- Tape Measure: Use a tape measure to get exact measurements.
- Level: To guarantee a level and straight grid.
- Ladder or Scaffold: It all depends on how high the ceiling is.
- Screwdriver or Drill: To fasten the grid’s elements together.
- Wire Cutters: To cut suspension wires to the correct length, use wire cutters.
- Ceiling Tiles or Panels: Select ceiling tiles or panels that are appropriate for your basement, such as moisture-resistant and acoustic tiles.
- Hardware for mounting: Clips, anchors, or screws to fasten the grid to the ceiling.
- Safety Gear: includes a dust mask, safety glasses, and gloves.
C. Prepare the Basement Space for Installation
- Make the Space Clear: Clear out the basement of any furniture, stuff that is stored, and debris. Establish an open work area.
- Inspect the Structural Ceiling: Examine the Structural Ceiling for any damage, leaks, or problems with its structure. Before putting in the drop ceiling, take care of them.
- Find Utilities: Determine where the HVAC ducts, plumbing, and electrical wires are located. To prevent interference during installation, mark these areas.
- Arrange the Space: Choose the grid layout (such as 2’x2′ or 2’x4′) and where the vents and lights will go. Use a digital tool or a pen and paper to sketch the layout.
Recall that thorough planning guarantees a seamless installation procedure and a polished drop ceiling in your basement! 🏠🏨
Installation Process
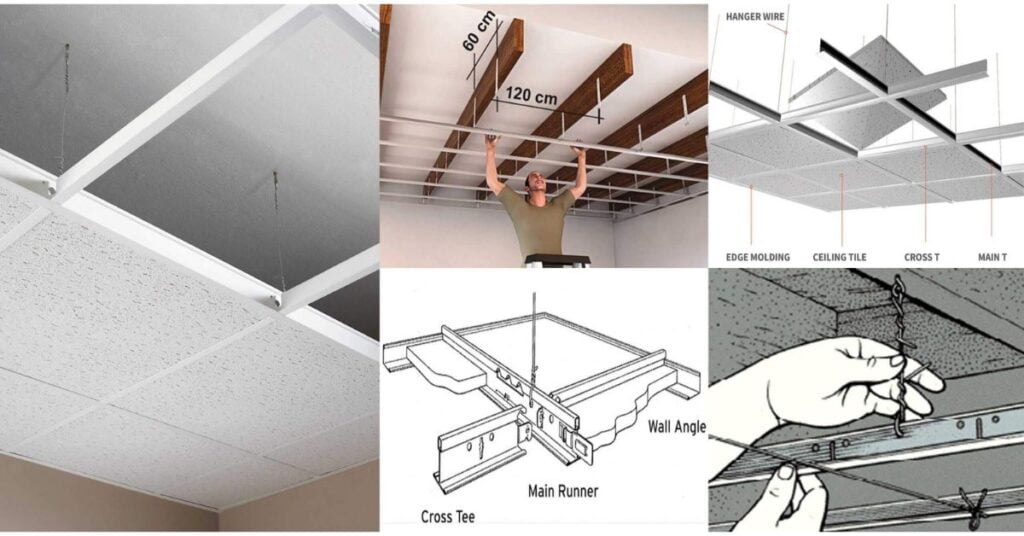
A. Install Wall Angles
- Measure and Mark the Perimeter of the Room:
- Attach Wall Angle Brackets to the Walls:
- The L-shaped metal components that support the drop ceiling grid are called wall angle brackets, sometimes referred to as perimeter channels or wall molding. Along the designated perimeter, fasten these brackets to the walls.
- Ensure Alignment and Levelness of the Wall Angles:
- Make sure the wall angle brackets are level and straight by using a level. To stay consistent, make adjustments as necessary.
- Measure the length of every wall in your basement to start. To indicate where the drop ceiling will be installed, write these measurements on the walls.
B. Install Main Tees
- Determine the Layout of the Ceiling Grid:
- Arrange the grid for your drop ceiling. Choose the distance between the main tees, which are the long, horizontal pieces that make up the grid.
- Install Main Tee Runners Parallel to the Longest Wall:
- Fit the wall angle brackets to the main tee runners. Parallel to the longest wall in the room, these main tees span the entire space.
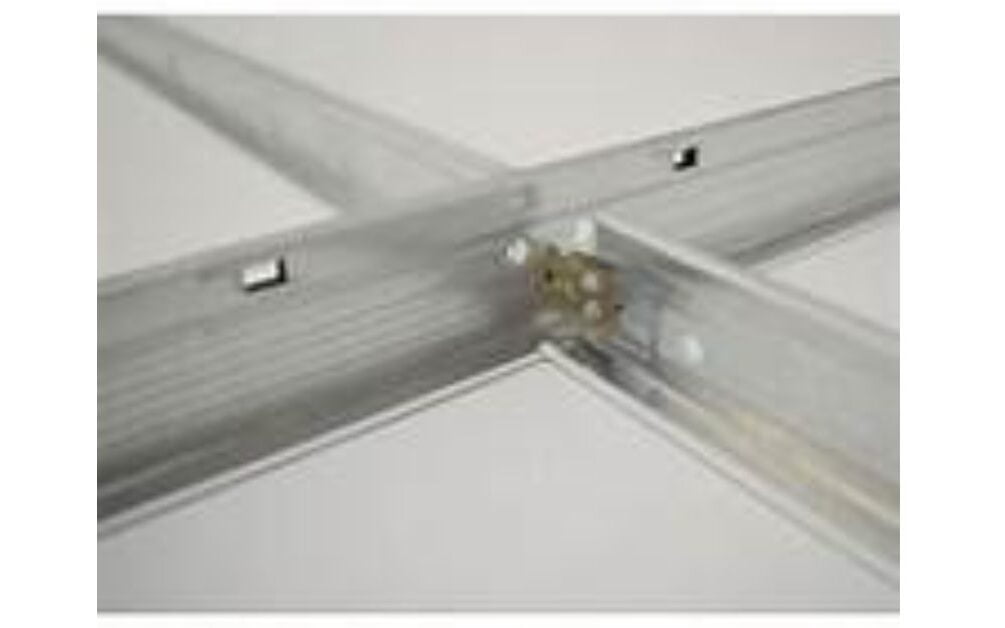
- Connect Main Tees with Splice Plates or Connectors:
- Splice plates or connectors can be used to safely join the intersection of two main tees. These connections guarantee alignment and stability.
- Cut Main Tees to Fit the Dimensions of the Room:
- The main tees should be measured and cut to fit the length of the room. Make sure they slide in between the angles of the wall.
C. Install Cross Tees
- Measure and Cut Cross Tees to Fit Between Main Tees:
- The grid pattern is formed by the connections between the shorter cross tees and the main tees. Calculate the gap between the main tees and cut the cross tees appropriately.
- Insert Cross Tees into Main Tees at Right Angles:
- To arrange the cross tees perpendicularly, slide them into the main tees’ slots. The grid structure is now complete.
- Use a Level to Ensure Cross Tees Are Horizontal and Aligned:
- Verify the cross tees’ levelness and uniform spacing. To stay consistent, make adjustments as necessary.
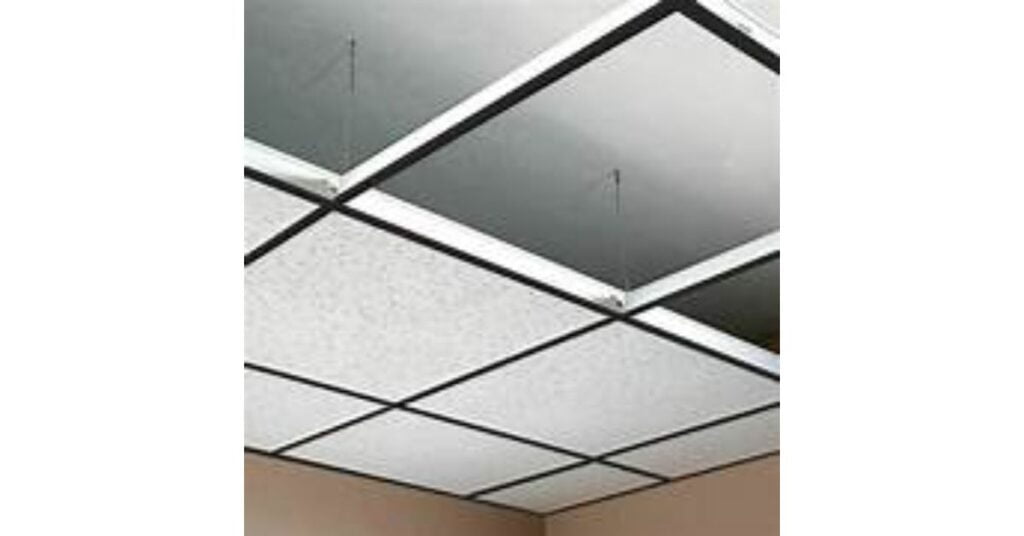
D. Install Ceiling Tiles
- Place Ceiling Tiles into the Grid, Starting from One Corner of the Room:
- Start lining up the ceiling tiles in the grid. Work your way across the room starting at one corner. Push the tiles up into the grid gently.
- Ensure Tiles Are Inserted Properly and Securely Seated in the Grid:
- Verify that every tile is positioned accurately in its designated grid slot. They must be securely fitted and not sag.
- Cut Tiles as Needed to Fit Around Obstructions or Along the Perimeter:
- Tiles can be trimmed to fit around vents, light fixtures, and other obstructions using a tile cutter or utility knife. Additionally, trim tiles to fit the room’s edges.
To create a drop ceiling in your basement that looks professional, don’t forget to take safety precautions, wear the proper clothing, and take your time! 🏠🏨
Finishing Touches
A. Install Lighting Fixtures
- Cut Holes in Ceiling Tiles for Recessed Lights or Other Fixtures:
- Measure the recessed light fixtures or other accessories (like speakers or vents) dimensions.
- The places where you want to install these fixtures should be marked on the ceiling tiles.
- Make tiny holes in the tiles with a hole saw or a keyhole saw. To facilitate simple installation, make sure that the holes are marginally bigger than the fixtures.
- Install Lighting Fixtures According to Manufacturer Instructions:
- When installing your recessed lights or other fixtures, pay close attention to the installation guidelines supplied by the manufacturer.
- Put the fixtures firmly in the holes you made.
- As necessary, connect the wiring, being careful to take safety measures.
- To make sure the lights are operating correctly, test them.
B. Install Access Panels
- Collect Tools and Materials:
- Access panels
- Measuring tape
- Spirit level
- Cordless drill
- Reciprocating saw or jigsaw
- Screwdriver
- Stud finder
- Tile saw (for tile access panels)
- Paintbrush
- Putty knife and utility knife
- Screws and anchors
- Tile adhesive
- Joint compound (for plasterboard)
- Sandpaper
- Primer (for metal access panels)
- Paint (for plasterboard/plastic access panels)
- Measure and Mark Opening:
- find the locations of studs, use a stud finder.
- Measure and mark the opening on all sides so that it is about 10 mm bigger than the panel.
- Make sure there is enough space above the opening for a ceiling access panel and that it spans two joists.
- Verify that the subfloor beneath the opening area is adequately supported by using a floor access panel.
- Cut Out the Opening:
- Use a drywall saw or utility knife to cut through the designated opening for plasterboard access panels.
- A reciprocating saw should be used for metal access panels.
- Use a tile saw to adjust the depth of the tiles for tile access panels.
- Prepare the Framing:
- Between the studs or joists on walls or ceilings, securely fasten wood framing around the rough opening.
- In order to properly support the access panel frame for floor access panels, bracing should be added below.
- Install the Panel Frame:
- Installing the particular panel frame requires adhering to the manufacturer’s instructions.
- Using the included screws, fasten hinged drywall or tile frames straight to the prepared framing.
- Think about bolting or welding metal frames to the opening.
- Attach the Access Panel:
- Cover the wall or ceiling opening with the access panel.
- Adjust it to fit the mounting space.
- Sliding or fastening the panel firmly into place depends on the design.
- Tape and Finish Seams:
- A joint compound (for plasterboard) should be applied to the joints.
- sand any edges that are rough.
- If the panel is made of metal, prime it
- Apply the Final Coat and Finish:
- If the panel is made of plastic or plasterboard, paint it to match the surrounding surface.
Recall that access panels make it simple to enter enclosed areas and grant access to structures and utilities that are concealed behind finished surfaces. Consider your application and location when selecting the appropriate kind of access panel.1. 🛠️🏧
Final Inspection and Cleanup
A. Inspect the Completed Drop Ceiling:
- Check the entire drop ceiling carefully for any problems or inconsistencies. Watch out for:
- Uneven tiles: Verify that they are level and correctly aligned.
- Misalignments or gaps: realign the tiles as necessary.
- Wires or pipes that are visible: Hide them behind the tiles.
B. Clean Up Debris and Discard Leftover Materials:
- Collect all of the scraps, dust, and debris left over from the installation.
- Get rid of any leftover materials, including packing, screws, and cut tiles.
- To ensure the area is completely cleaned, use a vacuum or broom.
C. Make Necessary Adjustments or Repairs:
- As soon as possible, take care of any problems you find during the inspection:
- Tighten any loosened clips or screws.
- Cover voids with more tiles or sealant.
- As needed, touch up paint or finish.
Recall that a well-done drop ceiling guarantees accessibility and functionality in addition to improving appearance. 🛠️✨
Conclusion
- The detailed procedure for installing a drop ceiling has been discussed, including:
- Choosing supplies: Choosing the appropriate grids, tiles, and accessories.
- Planning and measuring: Making sure that the size and arrangement are precise.
- Setting up the grid system: hanging cross tees and main runners.
- Installing ceiling tiles: lining up each tile with the grid.
- Adding fixtures and lighting: Including recessed lighting or other components.
- Final details: ensuring a seamless appearance and trimming edges.
- A well-installed drop ceiling improves your room’s appearance while also having useful uses:
- Acoustics: Lowers noise and increases sound insulation.
- Insulation: Offers a further degree of thermal protection.
- Accessibility: Makes wiring and utilities easily accessible.
- Imperfections hidden: Disguises uneven surfaces or structural flaws.
- Best wishes! Your basement looks and feels better thanks to the drop ceiling you installed.
- Now, savor the warm atmosphere your labor has brought to your house and give yourself a moment of appreciation
Recall that a well-done drop ceiling enhances the overall comfort of your living area in addition to adding value. 🏠✨
What is the process for installing a drop ceiling in a basement?
The installation process involves suspending a grid system from the existing ceiling, installing the ceiling tiles or panels into the grid, and making any necessary adjustments for a precise fit.
How long does it take to install a drop ceiling in a basement?
The duration of installation depends on the size of the basement and the complexity of the project. On average, it may take a weekend or several days to complete the installation process.
Are drop ceilings easy to maintain in a basement?
Drop ceilings are relatively easy to maintain with regular cleaning and occasional repairs or replacements of damaged tiles or panels.
How do I measure and plan for a drop ceiling installation in my basement?
Measure the dimensions of your basement ceiling, accounting for any obstacles such as pipes or ducts. Plan the layout of the grid system and determine the starting point for installation
Also read
5 Creative Basement Drop Ceiling Ideas: Revitalize Your Space